eHarta: Romanian maps under ‘Lambert-Cholesky’ (1916-1959) projection system. II Collect GCP point for mapsheets georeferencing
de Vasile Crăciunescu
Translation from Romanian by Codrina Maria Ilie.
News 16.06.2011: eHarta project won the "Better Data Award" at .
Framework: This campaign is a part of the eHarta collaborative project. For more details please visit the dedicated page.
Activity type: culegere de puncte de control pentru georeferențiere.
Number of people involved: -1.
Introduction
The eHarta project continues with a new challenge for our community : the collection of ground control points for georeferencing all the maps. Although, we intent in the end to use an automatic algorithm developed by our colleague Cristian Balint, to georeference all the entire archive, the availability of manually selected ground control points would be very useful, for verifying our results obtained with the above mention method, as well as for georeferencing the mapsheets with problems. In order to complete this mission, we will provide our community with a graphical interface.
The situation
The status of the ground control points collection can be followed up, in real time using the map below.

Missing mapsheets () | Not started mapsheets () | Processing mapsheets () | Finished mapsheets ()
How to use the selection interface
The selection interface is identical with the one used in our first campaign, metadata creation. To reach the page, one must follow the link Georeferențiere planuri de tragere on home page. For those of you whom just found out of our eHarta project, we recommend read first the eHarta document eHarta: Romanian maps under ‘Lambert-Cholesky’ (1916-1959) projection system, sections Create an account and Using the selection interface.
Using the interface for ground control points collection
By clicking on the Editing button the window for ground control points collection will open. (Figure 1).
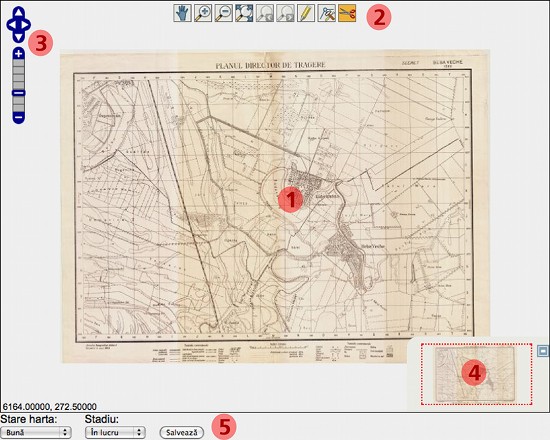
Figure 1. Interface for GCP editing.
1. The main map;
2. Toolbar (from left to right: map pan, zoom in, zoom out, zoom extent, zoom previous, zoom foreword, draw GCP, move GCP, delete GCP;
3. Navigation control within the map (zoom level, pan to north/est/south/west);
4. Entire map view. It allows the user to pan through or to recenter the main map;
5. Form with options for map's status and work progress. This is the place where the Save button is found as well.
The idea is, once more, simple. Using the interactive tools (pan, zoom, draw, move, delete) one can identify and mark on the screen the four corners of the map’s delimited geographical area. Marking of the points will be made only at the highest level of zoom, followed by entering the numerical attributes as follows: (1) upper-left, (2) upper-right, (3) lower-right, (4) lower-left. When selected, the drawing tool will change to a black cross and will be followed anywhere on the display by two perpediculary red lines. The tool icon, as well as the guidelines will help the user to mark the GCP as precise as possible on the interior corner of the neatlines of the map. The following imagines illustrate the GCP editing.
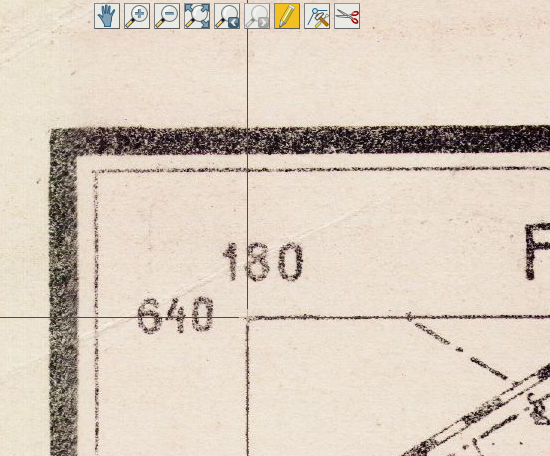
Figure 2. Using the zoom tool, the map will be centered on it’s first corner. One will select the drawing tool and will place the GCP exactly in the interior corner of the neatline of the map.
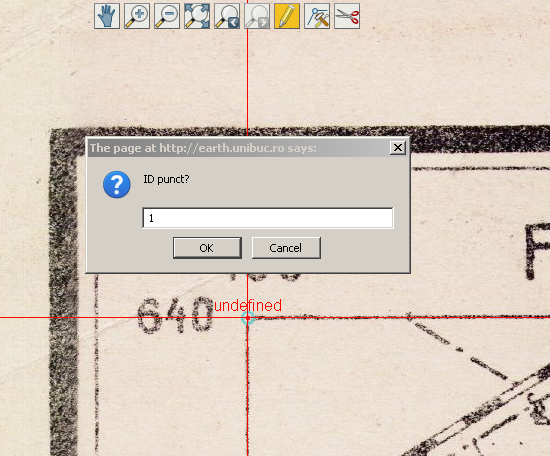
Figure 3. In the dialog box that appears immediately after the GCP has been marked, one will note down the numerical indicator of the GCP and will press OK.
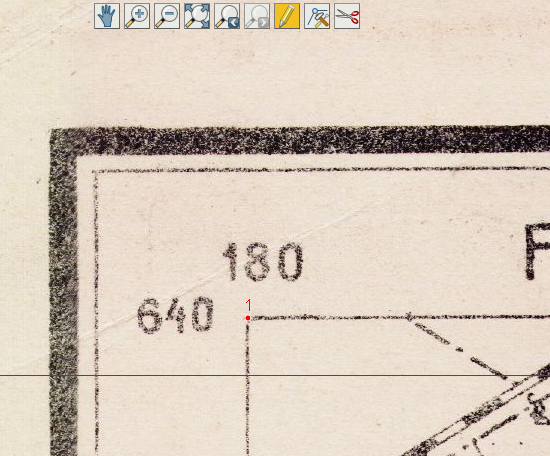
Figure 4. The marked GCP will appear on the map, labeled with it’s ID.
This procedure will be repeated for all four corners to the map. Finally, the workspace should look like in figure 5.
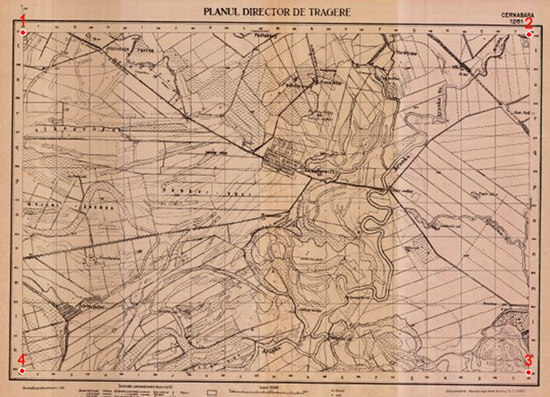
Figure 5. The map after the marking of all 4 GCPs.
Attention!
Information will not be saved if more than four points are marked. In this case, a error message will be displayed on the screen. Similar messages will be shown if the ID has a different value (1, 2, 3 or 4) or if more than one point has the same ID.
The position of the marked points can be changed with the tool Move. To use it, one must first select the desired GCP (left click on the point, it’s colour will change to yellow), afterwards, using drag-and-drop, one can move it to the new position. CGP can be deleted using the Delete button.
Once finalized the collection of the GCP, the option Finished from the Status menu must be selected and then clicked on Save. Successful data saving will be confirmed through a message. In cases of bad conditioned maps (torn corners or impossible to identify), from the menu Map Condition the option With problems must be selected.
Known issues
- The application does not work properly under Explorer and Opera. We strongly recommend that you use other browsers successfully tested by geo-spatial.org team: Firefox, Safari or Goolge Chrome;
- There are some map sheets with problems at low levels of zoom. Therefore, there is the possibility of GCp marked at 1:1 scale to appear misplaced at lower levels of visualization. One must not worry, the recorded coordinates are correct. They are just not rightly displayed at different levels of zoom. Though, for safety reason, please mark those maps as having problems;
- Due to the scanning process, some mapsheets have a significant rotation angle. In these cases, the red guidelines will not overlay on the maps” squares on a large distance from the corner. One must not worry, just make to be sure that one marks the corners as precisely as possible and alignment problems will vanish in the georeference process.
